Body Positioning and Hips: Getting Close to the Wall
Learn how staying close to the wall, turning your hips, and centering your weight over your feet saves energy and unlocks smoother climbing movement.
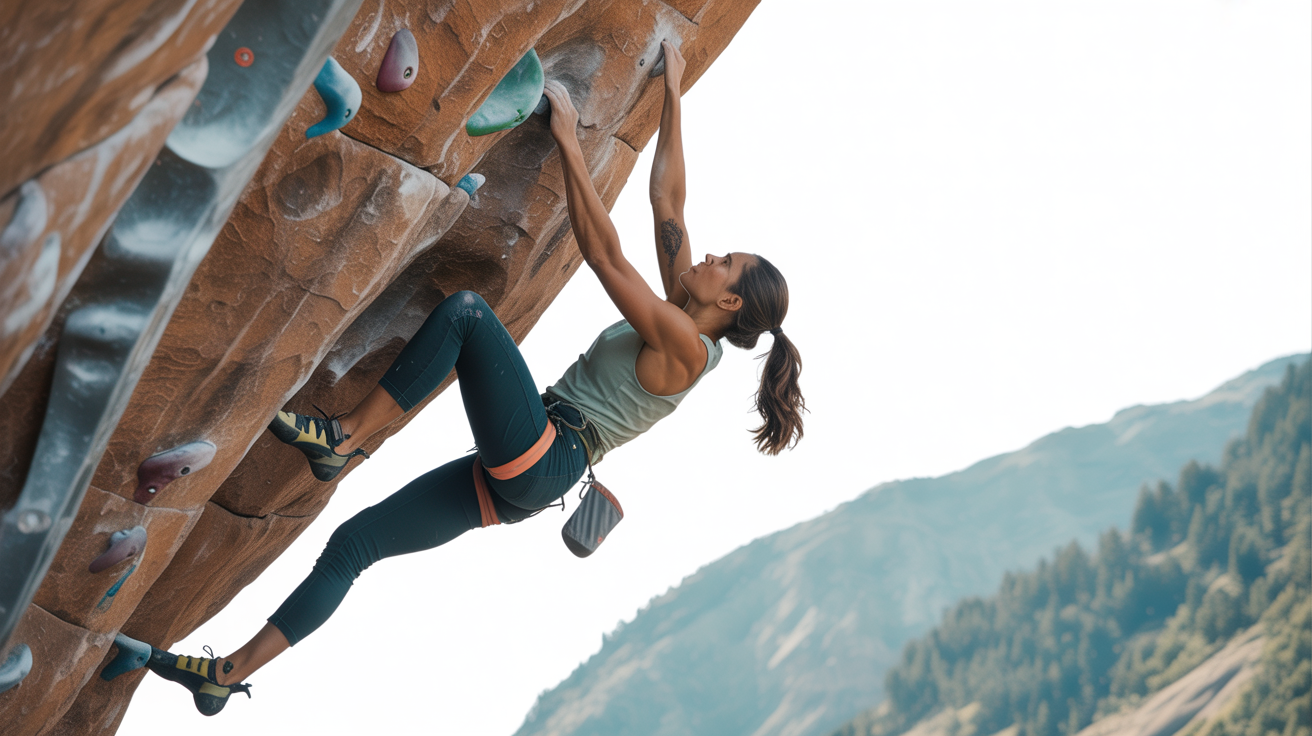
Watch a new climber on a vertical wall and you will usually see the same picture: arms bent and pulling hard, hips swung out behind them, chest parallel to the wall, and feet smearing wherever they happen to land. It looks exhausting, because it is. Good body positioning is not about flexibility or strength. It is about understanding where your center of gravity needs to be and what role your hips play in getting it there.
This guide covers the core mechanics of staying close to the wall, turning your hips, and fixing the posture habits that drain beginners fastest. Before climbing with a belay partner or attempting lead falls, always learn proper tie-in, belay technique, and falling skills in person from a qualified instructor at a gym or with a certified guide. No article substitutes for that hands-on foundation.
Why Staying Close to the Wall Saves Energy
The physics are straightforward. When your hips hang out away from the wall, your arms must work harder to hold you in. Your center of gravity is pulling you away from the surface, and your hands are the only thing fighting that pull. Arms tire quickly. Legs can work for much longer.
The goal is to keep your hips as close to the wall as possible so your skeleton, not your muscles, does the bulk of the holding. When your weight sits over your feet and your hips are near the surface, your legs bear most of the load. Your hands become guides and stabilizers rather than the primary anchors.
A useful way to think about this: imagine holding a heavy box. You carry it closest to your body, not at arm's length. Climbing works the same way. The closer your hips are to the wall, the less your arms have to compensate.
Hip Positioning and the Two Useful Stances
Most beginner clinmbing instruction focuses on arms and hands, but hips are the lever that changes everything else. There are two hip orientations you will use regularly.
Hips square to the wall. This is the default stance on very steep or overhung terrain where you need maximum hip flexion to get your feet high. Both hip points face the wall directly. It is useful but limits your ability to get your hips close on vertical routes because the structure of the hip joint restricts how far forward you can push.
Hips turned to the wall (the drop knee or hip turn). This is the more commonly needed adjustment on vertical and slightly overhung routes. You turn one hip toward the wall so that the hip on the side of your outside foot drops inward. This is sometimes called flagging or drop-kneeing depending on the foot position, but the underlying principle is the same: rotating the hip allows it to get closer to the surface, which brings your center of gravity in.
To feel this at home, stand facing a wall and press both hands flat on it. Notice how your hips naturally sit away from the surface. Now pivot on your feet so one shoulder faces the wall. Your hip on the near side can get much closer. That rotation is what you are doing on the rock or the gym wall.
Good climbing technique for beginners builds on this hip awareness early, because a climber who learns to rotate their hips before developing bad arm-pulling habits will progress significantly faster.
Center of Gravity Over Your Feet
The phrase "trust your feet" appears constantly in beginner advice, and the reason is that most new climbers do not trust them at all. They half-stand on holds while pulling down with their arms, effectively transferring weight away from the feet and back onto the hands.
Your center of gravity should be stacked as directly as possible over the foot that is bearing your weight. When it is not, the foot is likely to slip, which is often misattributed to bad footwear or bad rubber when the real cause is that no weight was on the foot to begin with.
To practice this, find a moderate slab or vertical route at the gym and try pausing at each move. Before you reach up, check: is your weight on your feet or on your hands? If you let go of the wall with one hand and wobble, the answer is your hands. Practice shifting your hips over your feet before you pull at all.
Footwork fundamentals and hip positioning are deeply connected. Placing your foot precisely on a hold only pays off if your hip position then loads that foot properly.
Common Beginner Posture Mistakes
These patterns appear consistently in newer climbers and each one traces back to the same root: treating climbing like a pulling exercise rather than a standing one.
The chicken wing. Elbows flare out to the sides instead of staying close to the body or pointing down. This is often a reaction to gripping holds too hard and trying to muscle up. It shortens the reach and wastes energy. Let your arms hang straighter on holds, especially when resting.
Hips glued to the outside. As described above, hips swinging away from the wall is the single most common problem. Any time you feel your forearms pumping out, check your hips first. Often the fix is not stronger arms but a hip turn.
Standing on the heel rather than the toe. Heel-standing drops your hips away from the wall automatically because the body rocks back to balance on a flat foot. Standing on the toe of your shoe keeps the hips in and transfers weight up the leg correctly.
Rushing through the hips. Beginners tend to skip the hip rotation and lunge for the next hold because they are afraid of falling or their arms are already pumping. Slowing down and making the hip adjustment before reaching for a hold is harder when tired, but it is exactly the moment it matters most.
Not using the legs at all. This is the habit that leg-dominant climbing technique is meant to address. Many beginners climb with their legs dangling or barely engaged while their arms do all the lifting. The legs contain the largest muscles in the body. Using them is not optional if you want to improve.
Practicing These Concepts at the Gym
Deliberate practice works better than just climbing laps and hoping things improve.
One useful drill: pick a route one or two grades below your current limit and climb it without bending your arms above ninety degrees at any point. This forces you to get your hips close before reaching, because you cannot compensate with arm strength.
Another drill: traverse low on the wall and pause every two moves to check whether your hips are touching or nearly touching the surface. If not, make the adjustment before moving on.
Video feedback is valuable here. Record yourself on a moderate route and watch what your hips do between holds. Most climbers are surprised by how much space they are leaving.
Working with an experienced climber or coach at your gym accelerates all of this. Technique feedback in the moment, when the movement is fresh, is far more effective than reading descriptions afterward.
Frequently Asked Questions
Does hip positioning matter on slab climbing?
Yes, but differently. On slab (terrain angled back from vertical), the goal is still to keep your center of gravity over your feet, but hips turning to the wall becomes less relevant. Instead, you are pushing your hips away from the surface slightly to load your feet. The common mistake on slab is the opposite of vertical: reaching in too close and pulling your weight off your shoes.
My hips feel stiff. Will flexibility training help?
Moderate hip flexibility does help, particularly hip flexor and hip opener work. However, most beginners do not need to be especially flexible to climb competently. Technique compensates for a lot. Focus on body positioning mechanics first, and add hip flexibility work if you find specific moves consistently blocked by range of motion.
I understand the concepts but forget them when I am actually on the wall. What helps?
Pick one cue per session rather than trying to fix everything at once. Spend a session only thinking about hip distance. The next session, only think about feet. Trying to monitor five things while also reading the route is too much. Single-cue sessions build habits faster than general awareness.
When should I ask a gym instructor versus figuring it out myself?
Any time you are working on belaying, lead climbing, outdoor climbing, or falling technique, get qualified in-person instruction. Those carry real consequences if done incorrectly and are not things to self-teach from articles or videos alone. Body positioning on a top-rope or bouldering problem is lower stakes to experiment with on your own, though a session with a coach will still accelerate things significantly.
Is body positioning different on overhangs?
Yes. On steep overhangs, getting your hips close often means pulling your knees toward the wall and using heel hooks or toe hooks to bring your lower body in. The principle is the same but the execution changes because gravity is pulling you more directly away from the surface. Beginners generally do not need to worry about steep overhang technique until they have solid vertical mechanics in place.