How to Choose a Climbing Harness
Learn how to choose a climbing harness as a beginner — parts, fit, certification, and care explained simply so you can climb safely.
If you're stepping into roped climbing for the first time, a harness is the first piece of personal gear worth understanding. It connects you to the rope, which connects you to safety. Getting the fit right and knowing what you're looking at matters more than finding a bargain deal.
This guide walks through the parts of a harness, what a beginner should look for, how to try one on properly, and how to take care of it over time. Worth noting upfront: a harness is life-safety gear. The points in this article are educational, but there's no substitute for learning to wear, inspect, and use your harness under the guidance of a real instructor at a gym. Read this to get oriented, then verify everything hands-on.
When Do You Actually Need a Harness?
Short answer: whenever you're doing roped climbing. That means top-rope and lead climbing at the gym, and most outdoor routes.
Bouldering is the exception. Boulder problems are short, unroped, and fall protection comes from a crash pad and a spotter. No harness needed. If all you're doing right now is bouldering, you can hold off on buying one.
Once you start top-roping, though, you'll need a harness every session. Most gyms rent them at the front desk, which is a perfectly reasonable way to get started before you commit to buying your own.
The Parts of a Climbing Harness
Before you shop, it helps to know what you're looking at. A standard sit harness has a handful of key components.
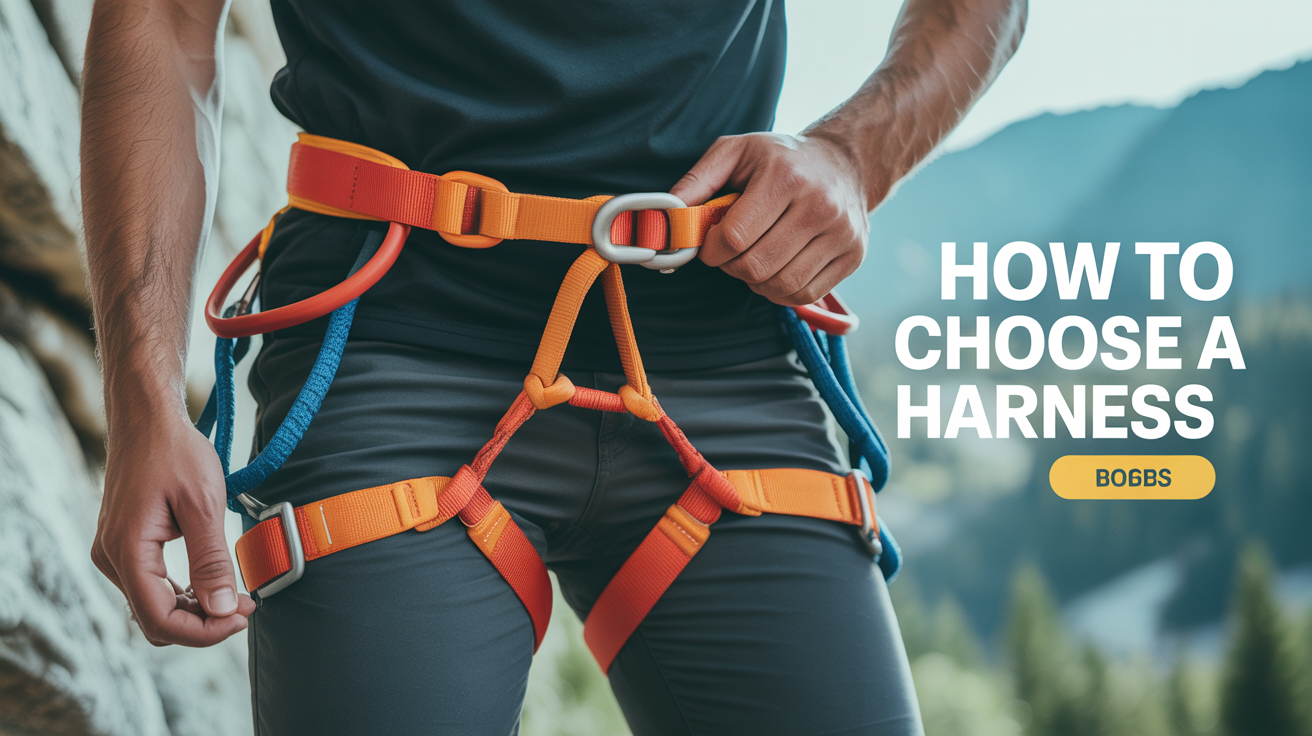
Waist Belt
The wide padded band that wraps around your waist, just above your hip bones. This carries most of the load in a fall. It needs to fit snugly: you should be able to fit two fingers under it, but it shouldn't slide down toward your hips or pull off over them when weighted.
Leg Loops
The two loops around your upper thighs. They share the load with the waist belt during a fall. Fit here is snug but not painful. You want circulation, not constriction. Many beginner harnesses have adjustable leg loops (with buckles), which is useful if your sizing is between sizes or you wear different thickness pants at the gym versus outside.
Belay Loop
The thick, oval loop at the front center where the waist belt and leg loops connect. This is where you clip your belay device and where you connect to an anchor when rappelling. It's made to handle enormous loads. Never tie in through the belay loop; it serves a different function from the tie-in points.
Tie-In Points
The two loops of webbing just above the belay loop, one through the waist belt and one through the leg loop bridge. This is where you thread your figure-eight follow-through knot when you're climbing. Both tie-in points are always used together.
Gear Loops
The small stiffened loops on the sides and back of the waist belt, meant for clipping quickdraws, cams, or other protection. If you're climbing exclusively indoors, you won't use these at first. But most harnesses have them, and they're handy once you move outside.
What to Look for as a Beginner
Shopping for a first harness doesn't need to be complicated. Here's what actually matters at this stage.
Fit Above Everything Else
No feature or price point replaces a good fit. A harness that's comfortable and secure is the right harness. One that's loose or slides is a problem, regardless of how well-reviewed it is.
When you try one on in the store (or at the gym rental desk), cinch the waist belt so it sits above your hip bones, not on them and not below them. Pull it off from above: if it comes over your head with the buckle done up, it's too big. The leg loops should hug your upper thighs without pinching.
Many gyms have a hang-test station where you can sit in a harness before buying. Use it. Hanging in a harness for thirty seconds tells you far more than standing in one.
Adjustable vs Fixed Leg Loops
Entry-level all-around harnesses typically have adjustable leg loops with buckles. This is worth having as a beginner. Your sizing may shift slightly between seasons, and adjustable loops let you dial in fit whether you're in shorts or thick gym pants.
Fixed leg loops (no buckle, elastic only) are lighter and faster to put on. They're common in sport and performance harnesses. Fine eventually, but not necessary right now.
Padding
For gym climbing and occasional outdoor single-pitch days, moderate padding is plenty. Thick padding is comfortable for long hang sessions on routes; thin padding saves weight for alpine or multi-pitch where you won't be hanging much. As a beginner doing a few hours at the gym per week, mid-range padding is the sweet spot.
UIAA or CE Certification
Any harness sold through a legitimate retailer in the US or Europe will carry a UIAA or CE certification mark. These certifications confirm the harness has been tested to handle serious fall forces. Don't buy used gear where you can't verify its history, and don't buy uncertified harnesses online from unknown sources. This is one area where cutting corners isn't worth it.
Price Range
A solid beginner harness runs roughly $50 to $80. Beyond that, you're typically paying for lighter materials, more refined padding systems, or specialized features you won't need yet. You don't need to spend more than that to start.
Beginner Harness Fit Checklist
Use this before every session once you own your own harness, and whenever you try a rental.
- Waist belt sits above hip bones (not on or below them)
- Waist belt is snug: two fingers fit under it, but it can't pull over your head
- All buckles are doubled back (the webbing feeds back through the buckle frame)
- Leg loops snug around upper thigh, no pinching or circulation loss
- Belay loop centered, not twisted
- No fraying, cuts, or soft spots on any webbing
- No cracks or deformation in buckles or plastic components
If your gym uses auto-locking buckles (some newer rentals do), check the buckle style before assuming you need to double back. The rental desk staff can show you in thirty seconds.
Renting Before You Buy
There's no reason to rush into buying a harness. Gym rentals are sized to fit most people, inspected regularly, and typically cost $5 to $10 per session. Renting for a month or two before buying gives you time to figure out what you like and what fits — and to make sure you actually want to keep climbing before spending money.
When you're ready to buy, go to a dedicated climbing shop rather than a general sporting goods store. The staff can help you try on multiple sizes and explain the differences between models. Online purchases work, but only if you already know your exact size in a specific harness model.
Care, Inspection, and When to Retire Your Harness
A harness isn't something you buy once and forget about.
After Each Climb
Brush off dirt and chalk. Store it away from direct sunlight, heat, and chemicals. UV degrades nylon over time, and even common household solvents (cleaning sprays, car products) can compromise webbing strength invisibly.
Before Each Session
Run through the fit checklist above. Look at the webbing, buckles, and stitching. You're looking for cuts, abrasion, fraying, stiff or discolored patches, and any deformation in the buckles. If something looks wrong, don't climb in it until a qualified instructor or shop has looked at it.
Hard Falls
If you've taken a significant fall, especially one where you decked (hit the ground or a ledge) or where the harness absorbed a very hard catch, have it inspected before using it again. A harness can sustain damage that isn't visible on the surface. When in doubt, retire it.
Age and Wear
Most manufacturers recommend retiring a harness after three years of regular use, or ten years from date of manufacture, even if it looks fine. The nylon degrades over time. Mark the purchase date on yours so you don't lose track. If you climb heavily (multiple times per week), the functional lifespan shortens.
FAQ
Does a beginner really need their own harness, or is renting fine?
Renting is completely fine to start. Once you're climbing two or more times per week, owning your own makes more financial sense and gives you a harness broken in to your specific body. But there's no rush. Rent until you're sure you love it.
Can I use a harness for both gym and outdoor climbing?
Yes. An all-around beginner harness works well in both settings. The main difference outdoors is that you'll use the gear loops (for clipping protection) and may be in it longer, so padding becomes more important on extended routes.
What's the difference between a harness and a sit harness?
Most climbing harnesses are sit harnesses. They wrap around your waist and legs and suspend you upright in a fall. Full-body harnesses (which also wrap the chest) exist for certain activities like canyoneering or very young children learning to climb, but they're not what beginners need for standard gym or sport climbing.
How do I know if my harness fits correctly?
The waist belt should sit above your hip bones and stay there when weighted. You should not be able to pull the buckled harness over your head. Leg loops should be snug with no pinching. When in doubt, have a certified instructor or gym staff member check your fit in person. It takes two minutes and is worth doing.
When should I retire a climbing harness?
Retire a harness after a significant fall or impact, if you see any visible damage (fraying, cuts, stiff webbing, damaged buckles), after the manufacturer's recommended lifespan (often 3 years of regular use or 10 years from manufacture date), or if you can't verify its history on secondhand gear. When uncertain, err on the side of replacing it.
A harness is one of those purchases that's easy to overthink. For most beginners, any well-fitting, certified all-around harness in the $50 to $80 range will serve you well for years. Get the fit right, learn to use it hands-on with a qualified instructor, and take care of it.
Once you've sorted your harness, take a look at the rest of what you'll need in Climbing Gear for Beginners: What You Actually Need, and when you're ready to add climbing shoes to the mix, How to Choose Climbing Shoes for Beginners covers fit and what to look for at that stage.